Showing posts with label latex. Show all posts

Tuesday, February 16, 2010

Matching fonts in Keynote and LaTeX

LaTeX is great if you want to typeset documents with lots of mathematics in them, but what if you want to make presentations with lots of math? Sure, there are LaTeX packages like Beamer with which you can straightforwardly make decent looking presentations using nothing but LaTeX. But none of those packages lets you easily control where items end up on a page, make subtle changes to overall lay-out, or add some motion to your slides.

Keynote does all of those things, and a bit more. Here's for example a slide of presentation I gave some time ago:


The things in the image are all created within Keynote (not in a separate drawing program like Adobe Illustrator), and some of them are even animated. This is simply impossible to do solely with LaTeX, and that's why I've been using Keynote for quite some time now for all my presentations.

However, there was always something annoying me: the fonts in formulae I got from LaTeXiT (a small program that lets you insert LaTeX formula in Keynote) didn't match the font over the overall presentation. And if you're a typesetting nerd like me, that's pretty annoying. Luckily, I found a solution. Here's an example with both type of fonts:


The difference is subtle, but certainly noticable. The greek letters haven't changed, but the others are in the same font in the second equation. Here is how you change fonts:

  1. First, go to the LaTeXiT preferences, and change the default configuration to use xelatex instead of pdflatex:

  2. Next, add the following to the LaTeXiT preamble:

    \usepackage{mathspec}
    \usepackage{xunicode}
    \usepackage{xltxtra}
    \setmainfont{Gill Sans}
    \setmathsfont(Digits,Latin,Greek){Gill Sans}


    Be sure to change the "Gill Sans" to match whatever font you're using in Keynote.

And that's it! After restarting LaTeXiT, all new equations you'll typeset will be in the correct font. Enjoy!

Wednesday, August 5, 2009

Setting up TeXlipse and Sumatra PDF


Update (24-03-2012)
Instead of going through the hassle of configuring SumatraPDF (steps 4-8 below), it's way easier to use the Eclipse PDF viewer PDF4Eclipse. It's specifically written for TeXlipse, and has forward- and inverse-search out-of-the-box.


After raving about how brilliant TeXlipse is, it's perhaps time to describe my actual LaTeX setup on Windows. The key ingredients are:
  • LaTeX distribution: MikTeX. I currently have version 2.7 installed, which has SyncTeX support (important for forward- and inverse-searching in PDF files). I haven't tried TeX Live, but that should in principle also work (it also has SyncTex support).
  • Editor: Eclipse + TeXlipse.
  • Previewer: Sumatra PDF. Yes, that's right, no DVI files for me!
Installation is a bit difficult, but worth the while. Here's how you do it:
  1. Download and install MikTeX 2.7 (or newer if you're up for it). Shouldn't be too difficult.
  2. Get a good version of Eclipse. A bit more difficult, since there are gazillion versions floating on the internet. The standard ones come with support for either C++ or Java, which we don't want. The cleanest distribution I could find is the Platform Runtime Binary. Download it and extract the zip file in C:\Program Files\ or the likes. Also put a shortcut to eclipse.exe on the desktop if you're lazy like me.
  3. Fire up Eclipse and follow the instructions on the TeXlipse website in order to install TeXlipse.
  4. Download and install Sumatra PDF. Also easy.
  5. And now the going gets though: it's time to configure TeXlipse. Luckily the TeXlipse folks also have a page for that. The extra ingredient from me is to add the switch "-synctex=1" to the pdflatex command, which enables PDF syncing. The pdflatex config should look something like this:
  6. Add a new viewer configuration for SumatraPDF, and make it the top of the list so it's the default viewer. Here's how its config should look:
  7. We're almost done. We still need to configure the inverse search for Sumatra PDF. Create a .BAT file in the Eclipse directory (or somewhere else convenient), with the following line:
    java -classpath "%ECLIPSEDIR%\plugins\net.sourceforge.texlipse_1.3.0\texlipse.jar" net.sourceforge.texlipse.viewer.util.FileLocationClient -p 55000 -f %1 -l %2
    There are no hard line breaks here, it's just one single line. Also add a environment variable via Control Panel -> System -> Advanced -> Environment variables -> System variables -> New. The variable name should be "ECLIPSEDIR", its value "c:\program files\eclipse" or wherever you installed Eclipse (both without the quotes).
  8. Configure Sumatra PDF for inverse search by running the command
    SumatraPDF.exe -inverse-search "\"C:\Program Files\eclipse\inverse_search.bat\" \"%f\" %l"
    where you should take care to properly point to the .BAT file you created in the previous step.
And that's it. Now you should be ready to experience all the wonders of the TeXlipse + Sumatra PDF combination. Enjoy!

Tuesday, August 4, 2009

The perfect LaTeX editor

LaTeX is great. It's math support is the best, and the automatic layout and referencing works perfect. Say if I wanted to write the Einstein field equations, all I'd have to do is type

G_{\mu\nu} + \Lambda g_{\mu\nu} = \frac{8 \pi G}{c^4} T_{\mu\nu}

in a text file (with some appropriate LaTeX specific headers), compile it, and I'd end up with

It's just brilliant.

However, most of the LaTeX editors available are just fancy text editors, with nothing quite special. Sure, they've all got the syntax highlighting and push-button compilation, but I want more. The reason I want more is because I've done some Java coding in the Netbeans IDE. Some of its features are:
  • Automatic code formatting. Any LaTeX enthusiast who has worked with multiple people on one file knows that your co-authors invariably mess up the formatting. Automatic formatting comes to the rescue with just one push of the button.
  • Live parsing. No more trying to figure out where those damn compilation errors are. Live parsing tells you with a red underline, much like the grammar check in Microsoft Word, the exact position your faulty code.
  • Code completion. Try it. Love it. Can't live without it. Why type the whole command when only the first few characters suffice?
  • Build-in documentation. Hover over a function or variable, and a nice documentation popup will appear which tells you all you need to know about that function / variable.
  • Subversion support. It tracks the changes you've made in the file with nice colors in the sidebar. And it automatically merges your changes with those of your collaborators. How cool is that?
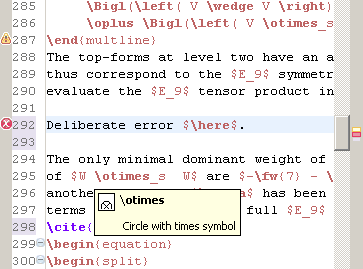
The list goes on, but these are the features I miss the most in almost any LaTeX editor. Almost any, because last week I discovered TeXlipse. It's a plugin for Eclipse that adds LaTeX support. And because Eclipse is a modern IDE just like Netbeans, it also has the features above out of the box. Once I got it working (which required some effort I must admit), I couldn't be happier! Here it is action:


Notice the red cross before the line of the error, and the yellow warning sign before the line where there's an underfull hbox. Although it's not visible from the screenshot, the cursor is over the \otimes, causing the popup to appear that describes that particular command.

Although I'm working with it for a only week now, I'm pretty sure I'll stick to TeXlipse. It just makes my LaTeX workflow that much more pleasant.